Published on
I AM GOING TO BE AN AUNT! There has been a lot of excitement in my family as we are going to be welcoming a new human into the family come fall! 
Naturally since my older sister is having a baby, I insisted on being the one to design the nursery. I would not take now for an answer. Luckily, my sister and her husband appreciate my design input because this is a project I really wanted to do. 

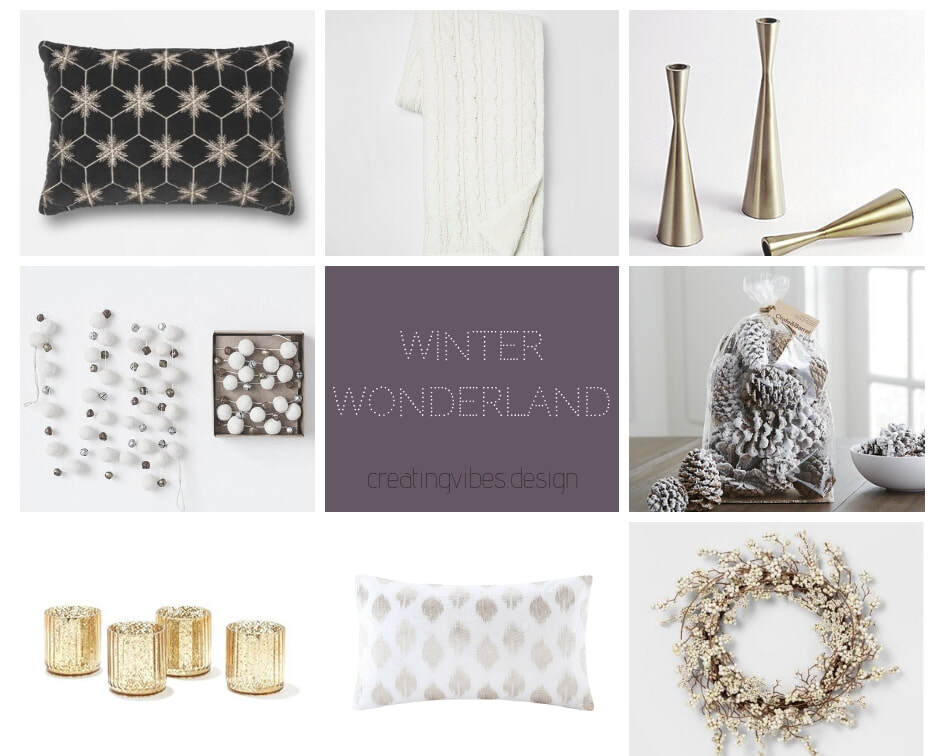
I originally visioned this space to be more neutral, but when we found out that Baby R is going to be a girl, we had to add in a bit of color. I did not want to make it super cliche with baby pink EVERYTHING. Instead, I opted for a coraly-pink for the artwork. Adding in some mustardy-yellow in the pillow and gold accents helps to create a feminine space without it being too in your face. I wanted this nursery to be able to transition into a toddler / kids bedroom over the next few years. 

Paint Color: Sherwin Williams - Zircon, SW 7667

Light: West Elm
Art: Etsy
Mirror: Target
Art: Target
Crib: Pottery Barn
Rocking Chair: Pottery Barn
Floor Lamp: Target
Curtains: West Elm
Polka Dot Wall Decals: Urban Walls
Faux Tree: Target
Basket Hamper: Target
Pillow: Target

Most of these pieces are all affordable. I tried to keep the budget in a reasonable range for this project. This mood board was meant as inspiration for my sister as she started shopping for nursery items. I will post some pictures as she finishes the room. Stay tuned!

Published on
Happy Earth Day friends! It is time for us ALL to break up with single use plastics.. By now, we all know the damages that are happening from single-use plastics. There are easy ways to incorporate better choices in our daily life that in the long run will have a big impact on our Earth. Below are just a few ways to get you started.
Produce Bags - These mesh bags from Amazon are super cute and an easy solution to take with you to the grocery store/ farmers market. No more plastic bags for your fruit & veggies.

Silicone reusable bags - This is a great solution in place of the plastic baggies we all use to pack lunches, snacks, etc. These are silicone based so they can be washed in the dishwasher for easy cleaning

Beeswax Wrap - great alternative to plastic wrap or tin foil

Shampoo Bars - no more plastic bottle waste with these bars from Lush

Metal or Glass Reusable Straws - if you are a straw lover, these are perfect for you. A lot of restaurants and bars are opting out of using straws. Which this solution is great because you always have a straw with you. 

What are your go to eco friendly choices? I try and implement new things everyday to be better to our Earth!

Published on
  1. Metallic Star Lumbar Throw Pillow - TARGET
  2. Chunky Chenille Reverse To Sherpa Throw Blanket - TARGET
  3. Brass Gold Metal Taper Candlestick Holders- AMAZON
  4. Creative Co-Op 72 Inch Wool Felt Garland Poms & Bells, Cream, Multicolor - AMAZON
  5. Small White Flocked Sugar Pinecones - CRATE & BARREL
  6. Gold Speckled Votive Holder, Set of 4 - AMAZON
  7. Stella Dot Cotton Oversize Lumber Throw Pillow - TARGET
  8. Wreath Mixed Berry White - TARGET

I am loving the GOLDS AND NEUTRALS this holiday season! The great thing about these items are that they are able to stay out all winter season long. You are not limited to keeping these out just during Christmas.  To be honest, you can utilize most of these neutral pieces year round and incorporate them into your standard decor!

What are your favorite Winter decorations?

Published on

before

AFTER

You guys... this was the easiest and cheapest kitchen upgrade I have seen! And look how gorgeous it looks!! It took less than 30 minutes and $25. My fridge has been an eyesore in my apartment. Since I rent, I don't have a choice but to keep it. I was thinking about ways I can make my kitchen look nicer and this popped into my head. This is the perfect DIY for a renter! It is no mess, no hassle and it is easy to remove when it is time to move out. 

All you need is peel and stick chalkboard vinyl. I purchased (2) rolls off of amazon. It even came with a chalkboard marker. 

First - Clear off all items from your fridge. Then clean with soap and water. Make sure to dry completely. 
Next - Cut vinyl pieces to size. Peel off the back and stick onto the fridge. I laid the vinyl horizontally on the fridge, sticking from left to right. The hardest part was working around the refrigerator handle. I used a utility knife to get the perfect cut around the handle.

For this project, I used just over 1 roll. You could probably get away with one roll if you have a small fridge. I was being generous with my cuts in the beginning so ran out by the bottom of the fridge. 

Last - Let your creative side loose! Add some fun sayings, your own artwork, weekly tasks, or a grocery list :)

Thats it! sooo simple and it seriously changed the look of my entire kitchen (for the better). I am in love with this easy DIY!


Published on
​Creating the perfectly styled coffee table is actually quite simple. No matter what your style, aesthetic, or vibe is these tips are sure to help you flaunt it in the best way possible!
Anchor
I am a major fan of designing with trays. Having a bunch of trinkets can seem messy and cluttered. Setting those items on tray anchors the objects to that place. Trays help to make the pieces on your coffee table feel purposeful.

Create Varying Heights
Layering and using different height objects creates interest. You can layer books and place objects on top of coasters. Do not use all objects that are the same height (unless you plan on layering them). Varying height and width pieces are key. Make sure to not use too tall of objects as it may interfere with your view of the TV.


Add Intriguing Items
This is where your own personal style comes into play! Be sure to add objects that are personal to you and show off those things that you love. GET CREATIVE!

Go Green
Adding a plant to your decor instantly brings life to your coffee table. Your choices here are pretty limitless. Houseplants are a great for adding color and something organic. I am newer to the plant mom club so I prefer succulents as they are easy to care for.

Bring Some Ambiance to the Table
Last but not least, one easy trick to creating the perfect coffee table is to add a candle. This adds ambiance when you are relaxing on the couch or entertaining guests. It can also serve as a decorative object if the candle comes in a unique container.


Published on
I was finally able to get my fall decor out last night. This morning when I left for work, it almost felt like it was the start of winter so it is about time I got my things out... 

I have really been digging the neutral color fall decor this year with a few pops of fall hues. I have a lot of other colors going on in my apartment so adding in fall tones seemed like a little too much. Although, I do have mustardy tones in my living room so this goes perfectly with the autumn color scheme. I wanted to be able to add in more fall vibes, without taking away from the design style I already have going on in my apartment. These items were the perfect add to coordinate with what I already have going on. 
Here is where you can find these items:

1. Pumpkin Figural - White --- Target 
2. Chunky Knit Throw in Yellow --- Target
3. Mixed White Berry Wreath --- Target
4. Give Thanks Pillow Cover --- Amazon
5. Buffalo Plaid Pillow Cover --- Amazon
6. Medium Lit Grapevine Pumpkin --- Target
7. Eat, Drink, & Be Cozy Sign --- Etsy
8. Pumpkin Vase Filler --- Target


Hope you all are enjoying your fall thus far! What are your favorite fall items to have in the house?

Published on
Image description
Happy belated Earth Day, fellow Earthlings! Zero-Waste Living is probably a term you have heard before. To many this term seems like a daunting, time-consuming and very expensive task to take on. This isn’t necessarily true. Sometimes making better consumer choices can in turn save you money, while simultaneously helping the environment. I am not writing this post to talk you into going full blown zero-waste. I want you to become aware of your purchases and better ways we can live being more sustainable

As a designer, I am always thinking about product and how they affect the space, the person in the space and the environment. Sustainable design is very important to me. I have decided that it was time to bring that sustainability into my own home. It has been my goal to be a more conscious consumer for quite some time, however I have not made the commitment to do so. I am making this Earth Day the marking of my commitment to be a better person to the Earth in which I live. My goal is to cut out unnecessary waste that is harmful to the Earth. I know it isn’t realistic to be zero-waste in the blink of an eye, but I do want to be more conscious about what I am buying. I am hoping while doing this, I will become accustomed to making more sustainable decisions in my day-to-day life.
Here are my top Sustainable buys in honor of Earth Day
1.       Bamboo Toothbrush
A toothbrush product that is used daily and is recommended to be replaced every 3 months. Purchasing bamboo toothbrushes over plastic toothbrushes is a great alternative. Bamboo is biodegradable and breaks down much easier than plastics. This bamboo tooth brush has soft, charcoal bristles to help whiten your teeth as well!
2.       Reusable Produce Bags
I typically try to avoid the plastic produce bags when grocery shopping. I find that they are not needed for most fresh produce (i.e. avocados, apples, zucchinis, bananas etc). You can place these items directly into your cart and skip the plastic! Items like brussel sprouts, green beans, spinach produce bags are needed. This is why I wanted to buy reusable produce bags as the plastic bags typically just get thrown out right away.. What a waste!

​
3.       Beeswax wrap – I am a sucker for plastic wrap and tinfoil. I use this stuff all of the time as it is all too easy and convenient. However, it is not convenient that it isn’t biodegradable. I am opting to try out beeswax wrap. Beeswax wrap is much more eco-friendly than the other options so it is a step in the right direction! This is a great buy because it is a natural substance so it is biodegradable and it is reusable so you can get more than just a single use out of it. Which I feel can save you money in the long run. 
4.       Shampoo Bar – I have been using shampoo bars from Lush Cosmetics. They are truly awesome! It is such a great alternative to your standard shampoos. Most shampoos have tons of chemicals in them that in many countries are banned. With these shampoo bars, there are fewer chemicals. Shampoo bars are great for traveling and reduce plastic waste as they are typically sold naked, without the plastic packaging. I store mine in a metal tin from Lush Cosmetics.
You have to start somewhere in order to become a more eco-friendly consumer. I don't expect myself to turn completely zero waste in a day. These four products are a great starting point. With these products you aren't eliminating anything from your lives or changing your lifestyle. I feel that with these products you aren't losing the convenience that we as humans tend to gravitate towards. These still are very convenient products. In fact, some of these products to be much better than the alternatives I used to use. 

I hope this inspires you all to start thinking more sustainably!

Happy Earth Day!!
Published on
Now that we are getting settled into the New Year, it is time to refresh and re-energize our homes.  De-cluttering is crucial for our well-being.  Life can be chaotic and messy, but our home is one place where it shouldn't be.  A home should be a place to relax and re-energize -- a sanctuary.  By taking the time to de-clutter and organize, we are freeing up time & space in our lives for more important things. 

That is exactly why I want to start 2018 off getting organized!  Join me by following these simple steps to a clutter-free home. 
1. Focus on one thing at a time. Dedicate one week to a room or area in your home. This will allow you to really dive in and focus on the main problem areas in your home. We want to get down to the nitty gritty and make sure that we get super organized. If you try and do everything at once or in one day, this leaves you bored or overwhelmed halfway through and more likely to call it a quits before finishing. Make sure you are carving out enough time each day/week to finish what you have started. Here is my breakdown over the next month

Week 1 > Living Room
Week 2 > Bedroom
Week 3 > Bathroom & Hallway closets
​Week 4 > Kitchen
2. Does this add value to my life? This is the question you need to ask yourself as you go through each item. If the object adds value and makes you happy, keep it. I know this is much easier said than done. You need to be honest with yourself. Not everything you have still adds true value to your life today. You cannot justify everything. 

A quick list of items that are no longer adding value:
-Old clothes - No I will not wear these clothes from highschool that are still sitting in my closet.
-Old Make-up: Gross! If it is past its recommended life, let it go. Same goes for cosmetics.
-Items you claim you will use in the future. If you haven't used it in months or years, it is the future and guess what... you don't need it!
3. Separate everything into categories. As you are sorting through each item, create keep, donate, and toss(recycle) piles. After sifting through everything in the area you are working on, go back through your keep pile a second or third time. Once you get into the groove of letting things go, it becomes a lot easier! You may be likely to let some more things go that you "thought" were adding value after coming back to it. Sometimes its nice to do this after a break so that you have a fresh mind when going through your items one more time.

TIP: Recycle and donate what you can. We want to keep as much of the stuff we are letting go out of the trash! Many retailers have a program for recycling clothes that are no longer useful. I.e. they have holes, stains or rips in them. This keeps textiles from going to the landfill and they are able to be reused and created into something new!
4. Find a proper home for everything. Pay attention to where your things tend to fall. You want to create a home that is convenient for its use, but makes the most sense. For example, if you tend to leave shoes by your front door rather than putting them away in your bedroom closet, that means that your bedroom closet probably isn't the best home for your shoes. Find a place near your front door that works. Put a shoe rack in your entryway closet for shoes you wear most often. 

Make sure everything gets its proper home. Stay away from junk drawers or bins that collect random items. This one is my biggest weakness. I have so many bins and baskets that are just full of random stuff I do not know what to do with. Half the time I forget I have any of the items in those bins or I can never remember where to find them. There is a better way to organize these items. If it is necessary to have bins throughout your home, make sure like items are placed in the same bins. Do not let them get to the point of overflowing and looking like a pile of junk.

TIP: Utilize wall space. Having lived in a tiny studio apartment for 2 years, I leaned quickly how essential this is. Vertical space is your best friend. It allows you to keep things in the area where they are useful without getting in the way. I recently put up barn wood shelves in my bathroom to eliminate the clutter that ends up all over my super tiny counter.
5. Break your habits. Theres a reason why your home continues to get cluttered and messy.  Take some time to reflect on why your home continues to become unorganized.  This means paying more attention to the things you buy and bring into your home. We are all guilty of impulse buys from time to time, but is important to stop buying things that we do not need. It may seem like a good idea at the time, but a month down the line it probably will end up in one of your junk bins and you will forget it ever existed. Be more conscious about the purchases you make! One bad habit I have is throwing things wherever I am. My dining table collects papers. I always through my bags, coat and shoes down immediately when I walk in my door. I need to work on getting in a habit to putting things in their designated home. 
Remember that organizing is an ongoing process! The best way to achieve maximum organization is to span it out over time and to continue doing it even when you have completed the big clean sweep. Now that you have a home that is refreshed, you can enjoy the serenity vibes of a chaos free home!

Organizing should not be depressing or stressful. This process should be a relief as you purge things that no longer serve a purpose in your life. What are some useful tips you use to de-clutter your home? How do you organize those pesky junk drawers? I'd love to hear from you as I embark on my organization journey over the next month.

Published on
Barn wood shelves are a fun way to add some character to your walls and create a place for storage. These shelves were fairly easy to make (Mostly thanks to my dad for doing all of the manual labor)
  • Gather barn wood. My parents live in an 150 year old farm house with the original barn still on the lot. They have tons of barn wood for me to use. If you do not have access to a barn, check out your local salvage shops. Here in Milwaukee we have the Habitat for Humanity Restore or WasteCap. These are great resources to find old original barn wood. 
  • Cut the barn wood to the desired length. These boards are 6"D and were cut to be 22"W.
  • Clean and Finish wood. It is a good idea to clean the wood so that you do not bring any dirt or bugs inside your home. I cleaned the boards with soap, water, and a bristle brush. Let dry. After wood is dry, seal the wood with Minwax Polycrilic Clear Spray. This is a super quick drying clear spray that makes it convenient and easy to use while keeping the look of the original barn wood intact. I found this on Amazon.
  • Next step is to make the brackets. If you do not have the tools to bend and cut metal, it is much easier to buy L brackets. Here I bought strips of cold-rolled steel and had my dad cut the strips, bent them to the desired size, and drill holes (for mounting).
  • Rust brackets. This step is personal preference. I wanted the brackets to have a rustic look. I took muriatic acid and painted it onto the brackets. Be careful with the acid not to get it on yourself or anything else. I set this in a bucket and let sit outside overnight.
  • Hang brackets on wall. I measured from the ceiling down and made sure the brackets were level and all lined up. Typically I would use screws to hold these shelves up, however, I live in a rental and did not want to put a ton of holes in my bathroom wall. Instead I used Command strips to hold the brackets. These are a renters miracle! They are easy to use, are reliable and easy to remove. Command strips can hold up to 10lb each so you have to make sure that you do not exceed this weight. Be sure to consider the weight of the brackets and the shelves if you go this route.

  • Set shelves on brackets. 
Picture
  • Decorate the shelves with your favorite items!
Published on
Every designer has a different set of rules that they swear by. Now these rules are not life our death, but I find them extremely helpful in designing a fun and beautiful home. 

#1 SURROUND YOURSELF WITH PIECES YOU LOVE

This rule is the most important and may seem like a given, but we all have purchased things we have later regretted. Its called impulsive shopping and I know you have been there too. Impulsive buying might be okay when shopping for clothes or other inexpensive items; you do not want to do this when designing your home. Let's be honest, creating a beautiful home can be super expensive. Just like Rome wasn't built in a day, your home shouldn't be either. You may feel anxious to finish designing your space, but I promise you you will love your space more if you wait until you come across the perfect pieces. You want to find things that make you happy and excited. Most people turn to Pinterest or other people and mimic their designs and ideas. This is fine for inspiration, but you want to make sure you tweak them to fit your own personal style. You are the one that has to live in the space so why not create unique vibes that you genuinely enjoy! I tend to be very picky when it comes to decorating my apartment. This is why I am nowhere near finished designing it. My absolute favorite pieces in my home are my coffee table & copper lamp. I kid you not, I looked at this coffee table for 2 years before finally pulling the trigger. Talk about thinking it over… This piece was SO worth the wait! Isn’t it beautiful?
#2 AVOID CLUTTER

Having too much stuff can be overwhelming and chaotic. I don't know about you, but clutter makes me anxious. I suffer from it! I try on a daily basis to declutter my apartment and slowly but surely it is working. I have a hard time parting with things  I no longer need. Having to much stuff makes your place seem messy even when it isn't. Finding a perfect place for your decor, knick-knacks etc. can help eliminate the feeling of clutter. I like to use bins and baskets to hide some of the things I do not need to stare at or use everyday.
Image description
#3 DON'T BE AFRAID TO MIX AND MATCH 

People tend to shy away from mixing different patterns and textures. It may seem daunting, but this is essential in creating a space to have visual interest. Being too matchy-matchy is incredibly boring and a huge mistake! The easiest ways to add texture and patterns to your home are with throws, pillows, and artwork. I love mixing different types of woods to create a vintage/eclectic look. I put this bold green pillow on a floral patterned chair. I think this works well because both patterns have a floral vibe and the green pillow pulls out the green tones from the chair.  Make sure that all of your patterns, colors, and textures flow with each other. You do not want it to feel too chaotic (see rule #2) unless chaos is what you love (see rule #1).

Have fun and put these rules to practice! What are rules that you live by when designing your home? Share some of the furniture pieces that you love below!