• Published on

    Styling a coffee table

    ​Creating the perfectly styled coffee table is actually quite simple. No matter what your style, aesthetic, or vibe is these tips are sure to help you flaunt it in the best way possible!
    Anchor
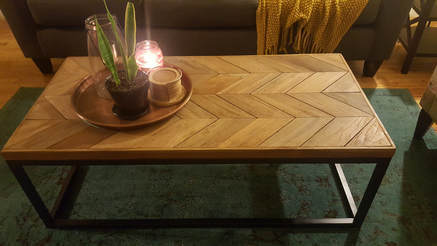
    I am a major fan of designing with trays. Having a bunch of trinkets can seem messy and cluttered. Setting those items on tray anchors the objects to that place. Trays help to make the pieces on your coffee table feel purposeful.

    Create Varying Heights
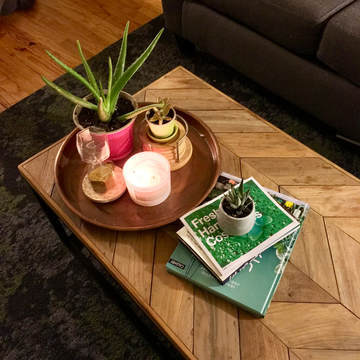
    Layering and using different height objects creates interest. You can layer books and place objects on top of coasters. Do not use all objects that are the same height (unless you plan on layering them). Varying height and width pieces are key. Make sure to not use too tall of objects as it may interfere with your view of the TV.


    Add Intriguing Items
    This is where your own personal style comes into play! Be sure to add objects that are personal to you and show off those things that you love. GET CREATIVE!

    Go Green
    Adding a plant to your decor instantly brings life to your coffee table. Your choices here are pretty limitless. Houseplants are a great for adding color and something organic. I am newer to the plant mom club so I prefer succulents as they are easy to care for.

    Bring Some Ambiance to the Table
    Last but not least, one easy trick to creating the perfect coffee table is to add a candle. This adds ambiance when you are relaxing on the couch or entertaining guests. It can also serve as a decorative object if the candle comes in a unique container.


  • Published on

    refresh & organize your home

    Now that we are getting settled into the New Year, it is time to refresh and re-energize our homes.  De-cluttering is crucial for our well-being.  Life can be chaotic and messy, but our home is one place where it shouldn't be.  A home should be a place to relax and re-energize -- a sanctuary.  By taking the time to de-clutter and organize, we are freeing up time & space in our lives for more important things. 

    That is exactly why I want to start 2018 off getting organized!  Join me by following these simple steps to a clutter-free home. 
    1. Focus on one thing at a time. Dedicate one week to a room or area in your home. This will allow you to really dive in and focus on the main problem areas in your home. We want to get down to the nitty gritty and make sure that we get super organized. If you try and do everything at once or in one day, this leaves you bored or overwhelmed halfway through and more likely to call it a quits before finishing. Make sure you are carving out enough time each day/week to finish what you have started. Here is my breakdown over the next month

    Week 1 > Living Room
    Week 2 > Bedroom
    Week 3 > Bathroom & Hallway closets
    ​Week 4 > Kitchen
    2. Does this add value to my life? This is the question you need to ask yourself as you go through each item. If the object adds value and makes you happy, keep it. I know this is much easier said than done. You need to be honest with yourself. Not everything you have still adds true value to your life today. You cannot justify everything. 

    A quick list of items that are no longer adding value:
    -Old clothes - No I will not wear these clothes from highschool that are still sitting in my closet.
    -Old Make-up: Gross! If it is past its recommended life, let it go. Same goes for cosmetics.
    -Items you claim you will use in the future. If you haven't used it in months or years, it is the future and guess what... you don't need it!
    3. Separate everything into categories. As you are sorting through each item, create keep, donate, and toss(recycle) piles. After sifting through everything in the area you are working on, go back through your keep pile a second or third time. Once you get into the groove of letting things go, it becomes a lot easier! You may be likely to let some more things go that you "thought" were adding value after coming back to it. Sometimes its nice to do this after a break so that you have a fresh mind when going through your items one more time.

    TIP: Recycle and donate what you can. We want to keep as much of the stuff we are letting go out of the trash! Many retailers have a program for recycling clothes that are no longer useful. I.e. they have holes, stains or rips in them. This keeps textiles from going to the landfill and they are able to be reused and created into something new!
    4. Find a proper home for everything. Pay attention to where your things tend to fall. You want to create a home that is convenient for its use, but makes the most sense. For example, if you tend to leave shoes by your front door rather than putting them away in your bedroom closet, that means that your bedroom closet probably isn't the best home for your shoes. Find a place near your front door that works. Put a shoe rack in your entryway closet for shoes you wear most often. 

    Make sure everything gets its proper home. Stay away from junk drawers or bins that collect random items. This one is my biggest weakness. I have so many bins and baskets that are just full of random stuff I do not know what to do with. Half the time I forget I have any of the items in those bins or I can never remember where to find them. There is a better way to organize these items. If it is necessary to have bins throughout your home, make sure like items are placed in the same bins. Do not let them get to the point of overflowing and looking like a pile of junk.

    TIP: Utilize wall space. Having lived in a tiny studio apartment for 2 years, I leaned quickly how essential this is. Vertical space is your best friend. It allows you to keep things in the area where they are useful without getting in the way. I recently put up barn wood shelves in my bathroom to eliminate the clutter that ends up all over my super tiny counter.
    5. Break your habits. Theres a reason why your home continues to get cluttered and messy.  Take some time to reflect on why your home continues to become unorganized.  This means paying more attention to the things you buy and bring into your home. We are all guilty of impulse buys from time to time, but is important to stop buying things that we do not need. It may seem like a good idea at the time, but a month down the line it probably will end up in one of your junk bins and you will forget it ever existed. Be more conscious about the purchases you make! One bad habit I have is throwing things wherever I am. My dining table collects papers. I always through my bags, coat and shoes down immediately when I walk in my door. I need to work on getting in a habit to putting things in their designated home. 
    Remember that organizing is an ongoing process! The best way to achieve maximum organization is to span it out over time and to continue doing it even when you have completed the big clean sweep. Now that you have a home that is refreshed, you can enjoy the serenity vibes of a chaos free home!

    Organizing should not be depressing or stressful. This process should be a relief as you purge things that no longer serve a purpose in your life. What are some useful tips you use to de-clutter your home? How do you organize those pesky junk drawers? I'd love to hear from you as I embark on my organization journey over the next month.

  • Published on

    How to: reclaimed barn wood shelves

    Barn wood shelves are a fun way to add some character to your walls and create a place for storage. These shelves were fairly easy to make (Mostly thanks to my dad for doing all of the manual labor)
    • Gather barn wood. My parents live in an 150 year old farm house with the original barn still on the lot. They have tons of barn wood for me to use. If you do not have access to a barn, check out your local salvage shops. Here in Milwaukee we have the Habitat for Humanity Restore or WasteCap. These are great resources to find old original barn wood. 
    • Cut the barn wood to the desired length. These boards are 6"D and were cut to be 22"W.
    • Clean and Finish wood. It is a good idea to clean the wood so that you do not bring any dirt or bugs inside your home. I cleaned the boards with soap, water, and a bristle brush. Let dry. After wood is dry, seal the wood with Minwax Polycrilic Clear Spray. This is a super quick drying clear spray that makes it convenient and easy to use while keeping the look of the original barn wood intact. I found this on Amazon.
    • Next step is to make the brackets. If you do not have the tools to bend and cut metal, it is much easier to buy L brackets. Here I bought strips of cold-rolled steel and had my dad cut the strips, bent them to the desired size, and drill holes (for mounting).
    • Rust brackets. This step is personal preference. I wanted the brackets to have a rustic look. I took muriatic acid and painted it onto the brackets. Be careful with the acid not to get it on yourself or anything else. I set this in a bucket and let sit outside overnight.
    • Hang brackets on wall. I measured from the ceiling down and made sure the brackets were level and all lined up. Typically I would use screws to hold these shelves up, however, I live in a rental and did not want to put a ton of holes in my bathroom wall. Instead I used Command strips to hold the brackets. These are a renters miracle! They are easy to use, are reliable and easy to remove. Command strips can hold up to 10lb each so you have to make sure that you do not exceed this weight. Be sure to consider the weight of the brackets and the shelves if you go this route.

    • Set shelves on brackets. 
    Picture
    • Decorate the shelves with your favorite items!
  • Published on

    3 Design rules to live by

    Every designer has a different set of rules that they swear by. Now these rules are not life our death, but I find them extremely helpful in designing a fun and beautiful home. 

    #1 SURROUND YOURSELF WITH PIECES YOU LOVE

    This rule is the most important and may seem like a given, but we all have purchased things we have later regretted. Its called impulsive shopping and I know you have been there too. Impulsive buying might be okay when shopping for clothes or other inexpensive items; you do not want to do this when designing your home. Let's be honest, creating a beautiful home can be super expensive. Just like Rome wasn't built in a day, your home shouldn't be either. You may feel anxious to finish designing your space, but I promise you you will love your space more if you wait until you come across the perfect pieces. You want to find things that make you happy and excited. Most people turn to Pinterest or other people and mimic their designs and ideas. This is fine for inspiration, but you want to make sure you tweak them to fit your own personal style. You are the one that has to live in the space so why not create unique vibes that you genuinely enjoy! I tend to be very picky when it comes to decorating my apartment. This is why I am nowhere near finished designing it. My absolute favorite pieces in my home are my coffee table & copper lamp. I kid you not, I looked at this coffee table for 2 years before finally pulling the trigger. Talk about thinking it over… This piece was SO worth the wait! Isn’t it beautiful?
    #2 AVOID CLUTTER

    Having too much stuff can be overwhelming and chaotic. I don't know about you, but clutter makes me anxious. I suffer from it! I try on a daily basis to declutter my apartment and slowly but surely it is working. I have a hard time parting with things  I no longer need. Having to much stuff makes your place seem messy even when it isn't. Finding a perfect place for your decor, knick-knacks etc. can help eliminate the feeling of clutter. I like to use bins and baskets to hide some of the things I do not need to stare at or use everyday.
    Image description
    #3 DON'T BE AFRAID TO MIX AND MATCH 

    People tend to shy away from mixing different patterns and textures. It may seem daunting, but this is essential in creating a space to have visual interest. Being too matchy-matchy is incredibly boring and a huge mistake! The easiest ways to add texture and patterns to your home are with throws, pillows, and artwork. I love mixing different types of woods to create a vintage/eclectic look. I put this bold green pillow on a floral patterned chair. I think this works well because both patterns have a floral vibe and the green pillow pulls out the green tones from the chair.  Make sure that all of your patterns, colors, and textures flow with each other. You do not want it to feel too chaotic (see rule #2) unless chaos is what you love (see rule #1).

    Have fun and put these rules to practice! What are rules that you live by when designing your home? Share some of the furniture pieces that you love below!